WooCommerce: Send Email When a Coupon Is Used

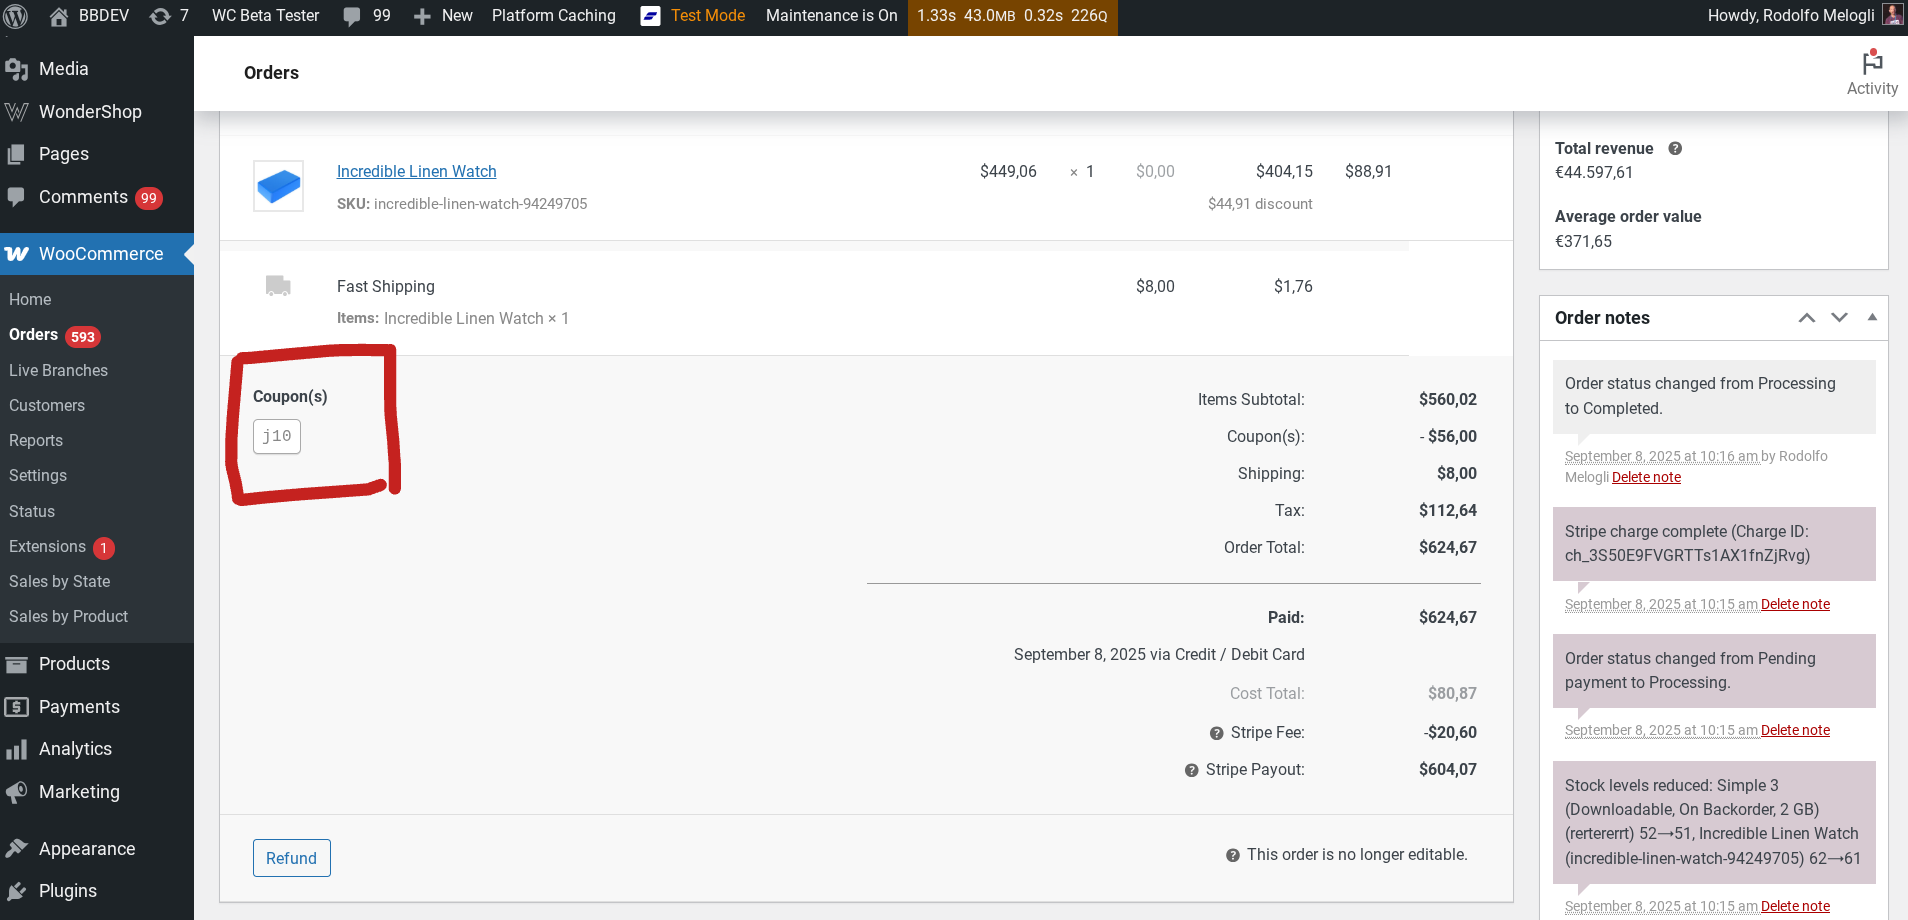
Coupons are often more than just discounts. They can represent affiliate partnerships, internal promotions, manual workflows, or campaigns that need tracking beyond basic WooCommerce reports. Yet, by default, WooCommerce doesn’t notify anyone when a coupon is actually redeemed in an order.

This code snippet solves that gap by sending a custom email whenever a specific coupon is used at checkout. You can notify an affiliate that their code was redeemed, alert yourself as the admin for tracking purposes, or inform a store manager that a manual action is required after purchase. The logic is simple, lightweight, and hooks directly into the “order complete” process, so it runs only when it matters.

Because it’s fully customizable, you can target one coupon or multiple coupons, change recipients dynamically, and tailor the email content to your workflow. If you rely on coupons as signals rather than just discounts, this snippet gives you immediate visibility without adding plugins or external services.

Continue reading WooCommerce: Send Email When a Coupon Is Used

WooCommerce: Simple Price Including/Excluding Tax Switcher

In WooCommerce, you can choose whether to display product prices including or excluding tax—but this setting is usually fixed site-wide, controlled by the admin. For stores serving both B2B and B2C customers, or international buyers, it can be confusing when visitors aren’t sure which price they’re seeing. Some customers prefer to see the final price with tax included, while others want to compare net prices.

What if you could give your shoppers the freedom to switch between the two views on the frontend? A simple toggle, checkbox or dropdown can make your store more transparent and improve user experience.

In this tutorial, we’ll show you how to implement a lightweight “Price Display Switcher” in WooCommerce. This solution respects your existing tax settings, remembers the user’s choice, and works across product pages, shop pages, and the cart.

You’ll get a working setup with minimal code, no heavy plugins, and a clean, native interface.

Continue reading WooCommerce: Simple Price Including/Excluding Tax Switcher

WooCommerce: Show or Hide Bank Accounts Based On Order

When WooCommerce “manual bank transfer” payment gateway is enabled and you add more than one bank account, WooCommerce outputs every bank account everywhere: on the thank you page, and in the order confirmation emails. That’s fine for simple setups, but not ideal if your store needs to show different bank details depending on the order properties.

On the Checkout Summit website, for example, I use a EUR/USD currency switcher powered by WooPayments so attendees can purchase tickets and sponsorships in their preferred currency. I also have Bank Transfer (“BACS”) enabled as a secondary payment method, and I’ve added two bank accounts in the settings: one for EUR and one for USD.

This creates a practical requirement: customers checking out in EUR should only see the EUR bank account, while those paying in USD should only see the USD bank account. Displaying both would be confusing and unprofessional.

To fix this, I worked on a small snippet that conditionally filters the BACS instructions. It checks the order currency (or any other property) and only returns the matching bank account.

Continue reading WooCommerce: Show or Hide Bank Accounts Based On Order

WooCommerce: Save Order Currency Exchange Rate

If you run a WooCommerce store with multiple currencies, you know that exchange rates can fluctuate constantly. By default, WooCommerce only stores the order total in the currency used at checkout, which means you might lose track of the actual conversion rate applied at that moment. This can make accounting, reporting, or analyzing profitability across currencies tricky.

A simple solution is to save the exchange rate used for each order directly in the order meta. This way, you can always see the exact rate applied when the customer paid, calculate your earnings in your main store currency, and avoid discrepancies caused by later rate changes.

In this snippet, we’ll show you how to capture the exchange rate at checkout and save it with the order. This is particularly helpful for stores that report in a single currency, do accounting in multiple currencies, or want precise historical financial records.

Continue reading WooCommerce: Save Order Currency Exchange Rate

WooCommerce: Get Orders Containing a Specific Product

In WooCommerce, finding all orders that include a specific product can be trickier than it sounds—especially with the new High-Performance Order Storage (HPOS) system. Since HPOS replaces the old posts and postmeta tables with custom ones, direct database queries are no longer the recommended approach. Instead, we should rely on the official CRUD functions and helpers like wc_get_orders().

Unfortunately, the official documentation doesn’t cover this particular use case at all. There’s no example showing how to fetch orders that contain a given product, which leaves many developers guessing or resorting to outdated SQL queries.

In this snippet, you’ll see a clean, efficient way to retrieve WooCommerce orders based on a product ID using wc_get_orders(). It’s fully compatible with HPOS, safe to use in any environment, and easy to adapt.

Continue reading WooCommerce: Get Orders Containing a Specific Product

WooCommerce: Sort Order Items by Name, SKU, Total, Quantity

By default, WooCommerce displays order items in the same order customers added them to the cart. That might work fine in most cases, but for many store owners, it’s more useful to have a consistent and logical sequence instead — especially when reviewing orders in the admin, generating invoices, or printing packing slips.

With a simple filter, you can change the sorting behavior of order items everywhere — on the Thank You page, in the admin order view, in customer accounts, and in any plugin that uses the same data source.

In this tutorial, we’ll go through a handy snippet that reorders WooCommerce order items using the woocommerce_order_get_items filter. You’ll see how to sort items alphabetically, by SKU, by quantity, by total value, or even by product category, depending on your specific workflow or fulfillment preferences.

Continue reading WooCommerce: Sort Order Items by Name, SKU, Total, Quantity

WooCommerce: Add Buy Now Button @ Single Product Page

If you’ve ever shopped on Amazon, you know how convenient it is to go straight from a product page to checkout with a single click. That “Buy Now” button eliminates extra steps and can make the buying process much faster. Inspired by this, I wanted to create something similar for WooCommerce stores — a simple button that lets your customers skip the cart and go straight to checkout, whether they’re buying a simple product or a single variation.

In this post, I’ll share a lightweight PHP + jQuery snippet that adds a “Buy Now” button right next to your standard “Add to Cart” button. The button dynamically updates if the product is a variable product or if the customer changes the quantity, ensuring that the checkout link is always accurate. With this solution, you can improve the user experience, reduce friction, and potentially increase conversions — all with just a few lines of code.

Continue reading WooCommerce: Add Buy Now Button @ Single Product Page

WooCommerce: Automatically Log Out Customers After Checkout

In WooCommerce, there are cases where you might want to log out a user after they complete a purchase. For example, new customers, one-time buyers, or sites where accounts are only needed temporarily, keeping users logged in after checkout may not make sense.

However, logging them out too early — like immediately on the Checkout page, or when the Thank You page loads — can prevent them from seeing their order details.

The ideal solution is to defer the logout until the user navigates away from the Thank You page. This way, checkout completes normally, the order confirmation is visible, and the user is safely logged out on their next visit.

In this post, we’ll show a simple PHP snippet that achieves this using WooCommerce sessions. The code sets a logout flag after checkout and automatically logs the user out silently the next time they visit any page, keeping the process smooth and user-friendly.

Here’s how to implement it.

Continue reading WooCommerce: Automatically Log Out Customers After Checkout

WooCommerce: Add Content Below Shop Page Products

By default, the WooCommerce shop page is quite limited when it comes to customization. Unlike standard WordPress pages, the shop page is a special placeholder that automatically outputs your products, so you won’t find a block editor or content area you can easily edit from the dashboard. This can be frustrating if you want to add extra information, promotional text, trust signals, or even a custom call to action beneath the list of products.

The good news is that WooCommerce provides hooks you can use to inject content exactly where you want it — including right below the products on the shop page. With just a small PHP snippet, you can display anything from simple text to HTML, shortcodes, or even dynamic content. In this tutorial, we’ll look at the correct hook for targeting the shop page only, and show you how to safely add content after the product loop.

Continue reading WooCommerce: Add Content Below Shop Page Products

WooCommerce: Move “Orders” to Top-Level Menu @ WP Admin

By default, WooCommerce keeps the “Orders” screen buried under its own top-level “WooCommerce” main menu item, alongside settings and other options. While this makes sense for a tidy admin sidebar, many store managers live inside the Orders page and would benefit from quicker access. Clicking twice every single time you want to check orders can become a small but constant annoyance.

What if “Orders” had its own dedicated spot in the WordPress admin menu? That way, you’d have the most important screen only one click away, and in a much more prominent place.

The good news is you don’t need heavy customization. With a few lines of PHP you can move the Orders link out of the WooCommerce submenu and place it where it belongs — directly below WooCommerce, after Products, and before Payments, Analytics and Marketing.

Also, you can check the free plugin below, where you can set the position dynamically, based on your preferences. But for now, here’s the snippet you can copy into your site.

Continue reading WooCommerce: Move “Orders” to Top-Level Menu @ WP Admin

WooCommerce: Distraction-Free WP Admin for Store Management

In a recent Twitter conversation, I reflected on one of the biggest challenges with WooCommerce — the cluttered WordPress admin sidebar.

With dozens of plugins installed, the admin menu quickly fills up with unrelated items, and WooCommerce’s own orders, payments, products, and settings are scattered across different areas. This fragmentation makes store management harder than it should be.

Inspired by this discussion, I decided to create a simple way to “take over” the admin area for WooCommerce store managers — a cleaner, streamlined admin view focusing solely on WooCommerce essentials like orders, products, and customers.

Here’s a code snippet that adds a toggle button in the admin bar, letting you switch to a WooCommerce-only admin menu and back. It also ensures the toggle stays active as you navigate, keeping your workflow smooth and intuitive.

Continue reading WooCommerce: Distraction-Free WP Admin for Store Management

WooCommerce: “Share Cart” Link Generator

Sharing a WooCommerce cart with specific products, quantities, and optional coupon codes can be a powerful tool for support, marketing, or testing.

This snippet adds a convenient “Generate Cart Link” option right in the WordPress admin bar for admins and shop managers, letting you instantly create a URL representing the current cart contents.

A single click builds a custom checkout URL including product IDs, quantities, and applied coupons. The link is then copied directly to your clipboard for easy sharing.

This approach is for the classic/legacy WooCommerce Cart page, making it simple to replicate or share carts without manually crafting URLs. It’s a neat little feature that boosts productivity and streamlines workflows — all with just a few lines of code.

Continue reading WooCommerce: “Share Cart” Link Generator

WooCommerce: Sort Downloads Table @ My Account

By default, the “Downloads” section in the WooCommerce My Account area is sorted by date — and that’s the only option. There’s no built-in way for customers to sort downloads by name, expiry, or remaining counts, which can be inconvenient when managing many files.

This snippet adds a custom dropdown above the table, letting users choose how they want to sort their downloads — alphabetically or in reverse — for any of the visible columns. It uses native WooCommerce hooks and a bit of jQuery, with no need to override templates.

Here’s how it works!

Continue reading WooCommerce: Sort Downloads Table @ My Account

WooCommerce: How to Stop Spam Orders on Free Products

I’ve been hit once again by a bot attack.

This time, I woke up to dozens of fake orders for my best-selling free mini plugin: the WooCommerce Autocomplete Orders Mini-Plugin. All of them placed overnight, all using obviously fake email addresses, and all totally useless.

Besides clogging up my order list and analytics, these spam orders also triggered multiple admin emails and slowed down my workflow.

Free products are a great way to provide value and attract users — but they also open the door to abuse.

That’s why I decided to implement a simple solution: limit how many times each free product can be ordered per day. Once the daily limit is hit, the product becomes temporarily unavailable with a “come back tomorrow” message.

In this post (and the video below), I’ll show you exactly how I did it, with a custom snippet that targets all free products in a specific category.

Continue reading WooCommerce: How to Stop Spam Orders on Free Products